What?
Reporting snapshot allow users to run
reports and save the result as records on custom object.
How?
By scheduling the reporting snapshots at
specific time, it lets you summarise data on custom object.
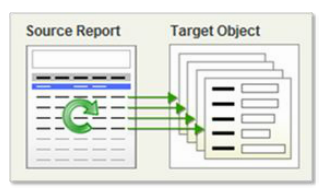
It means - It loads data from a custom
report (Source report) to a custom object (Target object) on a scheduled basis.
It stores each row of a report as an
individual record on object.
Why?
- It enables user to work with report data as other object records.
- It lets you report on historical data.
- Dashboard on pre-summarised data.
- Viewing trends in data stored in custom object.
Sounds interesting right. More than this,
it’s very easy to create as well.
Let’s get started..
Let’s take a use case for better understating
of its use and implementation.
Simple Use Case where we can use Reporting
snapshot - To track how many Cases are
opened and closed per day by user (The summarised data will be stored in one
custom object to view the trends in data via the custom object).
Before setting up Reporting snapshot – we must
do these following 3 steps.
1. Source report
Create a custom report on
object – at which summarised data you want to load for viewing the trends via
custom object.
Also, include the fields
on report that you want to store as record into a target object.
NOTE: Source report must
be Tabular or Summary report.

2. Target Object
Create a new custom object
that will fetch source report data into it.

3. Target Object Fields
Create fields on the
Target object that will receive the results from Source report.

After creation of source report, target object and its fields, it's time to define Reporting Snapshot.
Define Reporting Snapshot
For defining reporting snapshot :-
1. Go to Setup,
enter Reporting Snapshots in the Quick Find box.
2. Select Reporting Snapshots.
3. Click New Reporting Snapshot button
to create reporting snapshot.

4. Enter a name,
unique name, and description for your reporting snapshot.
5. Choose a user
in the Running User field
by clicking the lookup icon.
6. Select a report from the Source Report drop-down list.
Important - you can only choose either Tabular or Summary report and the
drop-down doesn’t show the Standard
reports.
7. Select a custom object from
the Target Object drop-down list.
8. Click Save to save the definition of your
reporting snapshot or click Save & Edit Field Mappings to
save your reporting snapshot and map its fields with Target object.
NOTE: Based on the selected Running user’s data visibility and access, data will be loaded int the Target object from source object.

After creating defining reporting snapshot,
next step is to map the fields between source report and
target object.
Map Fields in Reporting Snapshot
1. Specify the Grouping Level so that, data will be
extracted from the summary fields of the selected source report and will be
loaded into selected target object.
2. Grouping
Level show all groupings present in Source report (up to 3 level).

3. Now do the field
mappings from source report (displayed on the left side) to target object (displayed
on the right side).
4. Click on drop-down
list and select a field from the source report to map to a custom object field
in the Fields in Target Object column.
5. Only summary fields can be mapped for
reporting snapshots based on summary reports. Based on grouping selected the
fields may differ while mapping.
6. Click Quick Save to save field mappings and continue
mapping fields, or click Save to save
field mappings and return to the reporting snapshot's detail page.

Now, we all set, only thing left is to run the
report and load the data into the target object.
Schedule Reporting Snapshot
Reporting snapshot can be scheduled daily,
weekly, monthly – based on your need. As we need dily Case count so we will
schedule it for daily.
1. On reporting snapshot’s detail
page, look for Schedule Reporting Snapshot section.
2. Click on Edit
button to schedule the reporting snapshot.

3. Select checkbox to send email
notification when it finishes running the reporting snapshot.
4. Schedule the reporting snapshot
to run by selecting the Frequency, Start Date, End Date and Time.
5. Click on Save button.

6. After saving the reporting snapshot, click on Edit to update
the notification and frequency settings of the reporting snapshot.
7. Click Delete to permanently delete the existing schedule of when
the reporting snapshot runs.
Run History
After reporting
snapshot finishes its run, it sends email notification based on notification
settings done during its schedule. Also, we can track its history under Run
History section on reporting snapshot detail page.

I hope you will like this post. So, Shoot it. Save it. Share it.
Thanks!!
I have read your blog its very attractive and impressive. I like your blogsalesforce Online Training
ReplyDeleteThank you Akhila
ReplyDeletesmm panel
ReplyDeleteSmm Panel
iş ilanları
İnstagram takipçi satın al
hirdavatciburada.com
Https://www.beyazesyateknikservisi.com.tr/
servis
tiktok jeton hilesi